Quite recently I got around to read Continuous Delivery, a book which I highly recommend to everyone since it is one of the best IT books I’ve read in a long while, and because of this book the technical and more importantly business value of automating everything for your delivery pipeline has become much more clear to me.
In a project for one of my current clients we are taking baby steps towards implementing continuous delivery. One of the crucial steps to accomplish this is having plenty of automated tests to confirm the quality of the deployable before moving on to the next step in the deployment pipeline. Having good code coverage by unit tests is important for this, but this will only get you so far. The next step in this process is having integration tests to test all components as a whole, this is why we started building a framework for running our integration tests. This helps us to be more confident about the quality of our application and also minimize the time we lose by refactoring and merge issues in the future.
To be able to run these integration tests on a regular basis, we needed to set up a version of our application on a Tomcat 8 server and make sure our code would automatically be deployed onto it. To accomplish this, three steps had to be taken:
1. Deployment job on Jenkins
The deploy plugin is great for deploying to several containers, including Tomcat. The only thing you need have to modify in your Tomcat instance to get deployments working is adding a user to the server.xml with the manager-script role. You probably already have a user in there with the manager-gui role to access the admin web interface. The Tomcat documentation mentions that you should not give both these roles to the same user. To avoid this, we created a new user with the manager-script role:
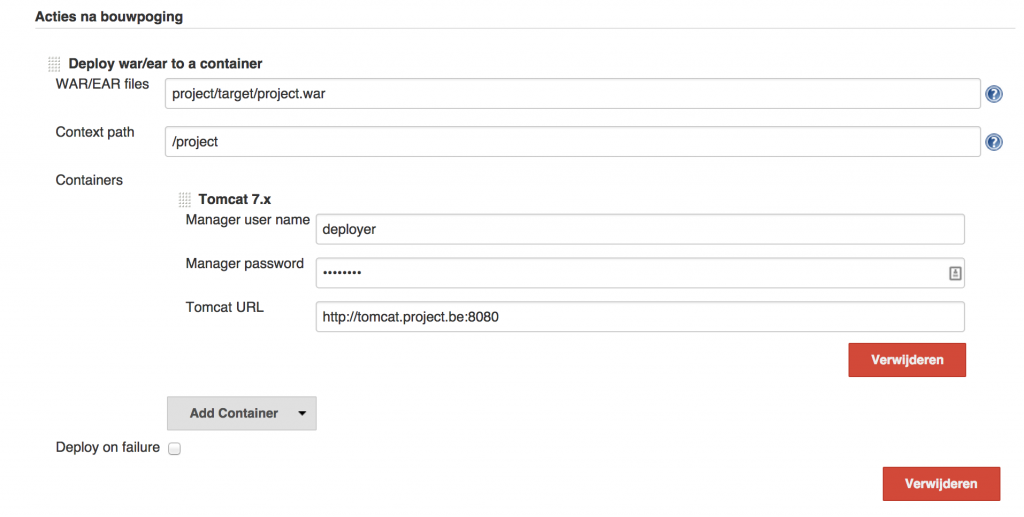
<user username="deployer" password="deployer" roles="manager-script" />After you’ve edited the Tomcat server.xml file, you can return to Jenkins and add a post-build action to deploy your war file. There are a few settings that you need to fill in:
WAR/EAR file: Insert the path to your war/ear file
Context path: Insert the context (URL) path you want to expose your project on
Manager user name: Insert the USERNAME of the user with the manager-script role in Tomcat
Manager password: Insert the PASSWORD of the user with the manager-script role in Tomcat
Tomcat URL: Insert the Tomcat URL
NOTE: Selecting container Tomcat 7.x also works for Tomcat 8.x
2. Restart Tomcat with PsExec before deploying
This step is crucial. Since the deployment jenkins job will do hot deployments on the Tomcat server, it will eventually throw OutOfMemoryError’s after a few runs. In our case the Tomcat service was running as a Windows service, so I went looking for a way to be able to remotely restart a Windows service from the Jenkins server. After googling for a bit I came across PsExec which is small utility program to run remote scripts on Windows machines which would me restart the Windows service from our remote Jenkins server. After downloading this utility and adding it to the server PATH, so I can use it directly from a command prompt, I quickly tested this out from my own user with the following command:
PsExec.exe -u <USER> -p <PASS> \\<REMOTE_SERVER> net stop <SERVICE>
PsExec.exe -u <USER> -p <PASS> \\<REMOTE_SERVER> net start <SERVICE>
My user account has access privileges to both the Jenkins service and the remote Tomcat server where the application is being deployed. So these commands worked like a charm. After running these commands as a pre-build step in Jenkins, I couldn’t figure out why I kept getting a Access is Denied error.
Luckily I found this post StackOverflow that explains that PsExec command tries to connect to the remote server’s ADMIN$ share using your local credentials (user logged in) that is executing the PsExec command. In our case, this was a user that has no access to the other server and we had no intention of adding this user to the other servers. This is where the cmdkey.exe Windows utility comes in handy which helps use manage user credentials. By setting credentials for the remote server, it will be used by the PsExec command, so this is what we ended up with:
cmdkey.exe /add:<REMOTE_SERVER> /user:<REMOTE_SERVER\USER> /pass:<PASS>
PsExec.exe -u <USER> -p <PASS> \\<REMOTE_SERVER> net stop <SERVICE>
PsExec.exe -u <USER> -p <PASS> \\<REMOTE_SERVER> net start <SERVICE>
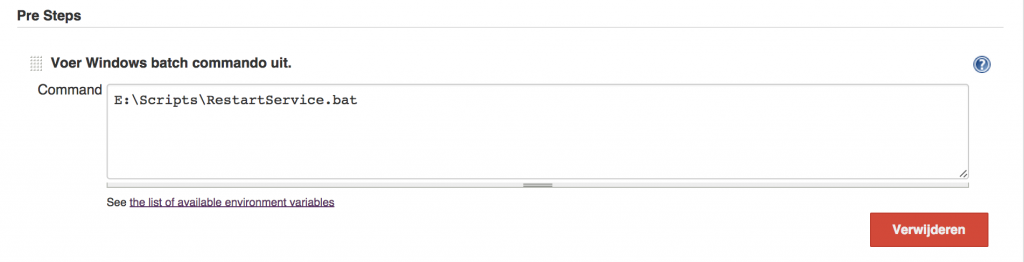
cmdkey.exe /delete:<REMOTE_SERVER> We stored this script as RestartService.bat on our Jenkins server and executed it from Jenkins as a pre-build (deploy) step. It took me a while before I got to this stage. After doing this we have a working daily deployment job, now only thing left to do is actually running the integration tests against it.
3. Integration Test job on Jenkins
This is up to you how you want to run your integration tests, most likely if you are using maven you will also be using the failsafe plugin to run your tests. I don’t go further on this since it is mostly depending on your setup.
After spending so much time trying to get the restart working on a remote server, I decided to put it in a blog post so hopefully someone else can benefit from it in the future. Do you have an other solution to do this? If so, do share with me!