You’ve been reading much about Continuous Integration and Continuous Deployment and think it only applies to big projects? Think again. A simple site like this website can benefit from it, that is why I will show you how easy it is to set it up for a GitHub project with Travis CI. What I want to achieve is that every Git push will result in an automated deployment of my website on Bluemix. This will only take a few minutes to setup.
If you are currently using a public GitHub repository then you can also use Travis CI for free! If you don’t know Travis CI, it’s a hosted Continuous Integration platform that makes it easy to have automated builds for your applications. If you have used Jenkins before, you can compare it with that, only you don’t have to install anything since it’s an online service so you can just sign up with your GitHub account.
Luckily for me, I’m using a public repository for my website so I’m able to try out it out without paying a dime. What I want to accomplish is that each commit on my Git master branch triggers a build in Travis CI. This build will do a couple of things, first it will generate my Jekyll static site, then run html-proofer to see if any of the links on the website are broken and finally deploy the site to Bluemix. Since Bluemix is based on Cloud Foundry this guide will also work for any other provider that uses Cloud Foundry like Pivotal WebServices, anynines and so on. I prefer Bluemix because it offers a lot of services and also has a pretty decent free tier. Free GitHub, check. Free Travis CI, check. Free Bluemix, check. Let’s do this!
Doing this will mean I can rest assured that Jekyll is able to build my site, that all the links in my pages are functional (html-proofer) and that the latest version of my code is always pushed to the Bluemix server. Automating this process will leave it less error prone and give me more time to actually write content!
Sign up for Travis CI
Head over to Travis CI and Sign up with you GitHub credentials.

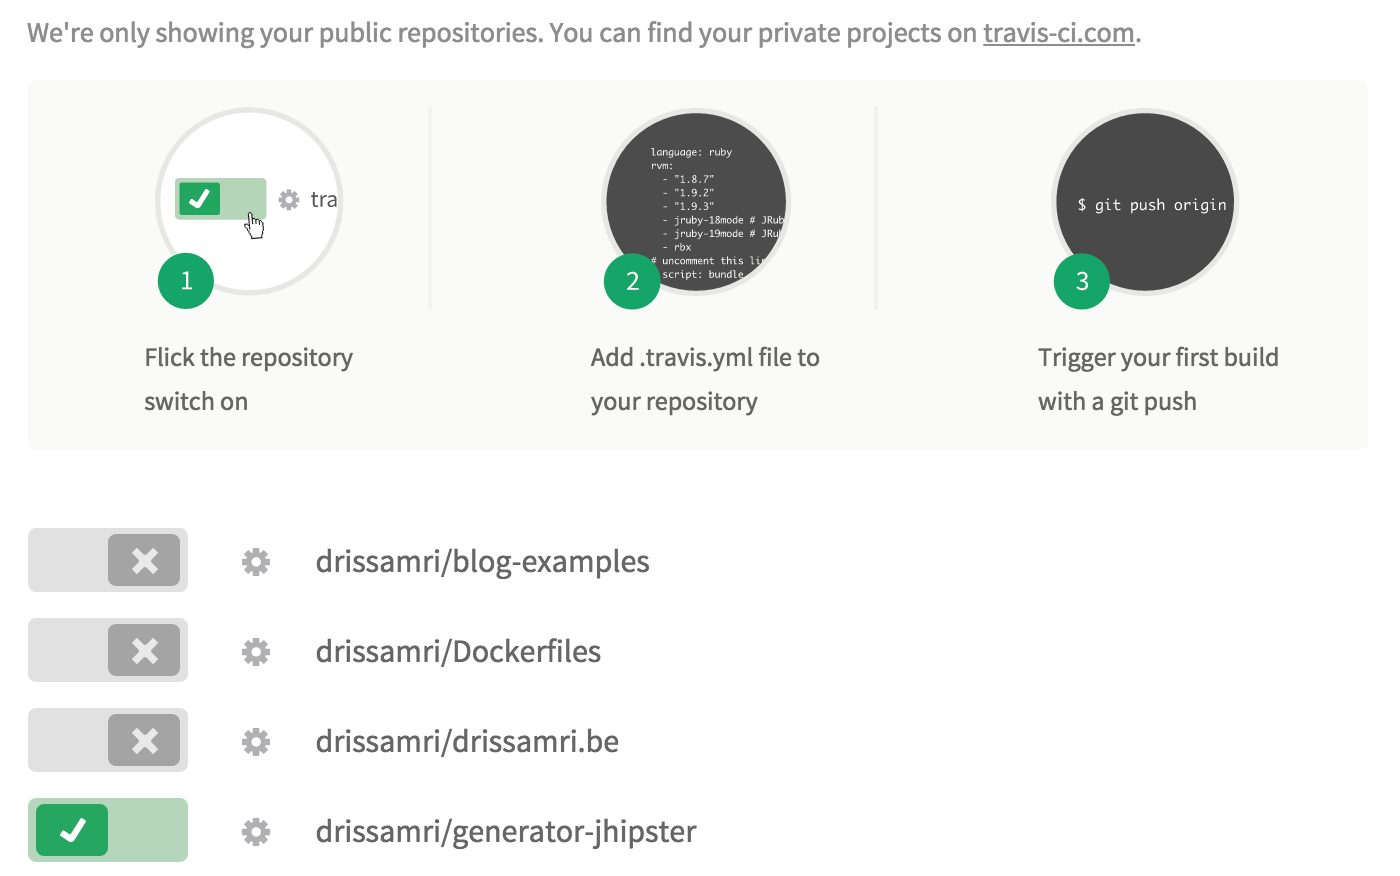
Next head over to your profile so you can select which repository you want to enable in TravisCI. In my case this is the repository for this site, the repository is called drissamri/drissamri.com. This will enable TravisCI start whenever a commit is pushed to Git.
Create a Travis CI configuration file
First let’s define a Gemfile in the project root folder to define the dependency that is needed to execute Jekyll.
source 'https://rubygems.org'
gem "jekyll"
Now you will need to provide Travis CI with instructions on what to do on every commit, this is done by providing a configuration yaml file called .travis.yml in the root of your project. There are two ways to create this file, I chose to create the file manually but you can also install the Travis ruby gem to help you out.
Travis CI works with a .travis.yml file that will have all instructions on what to do when a build is started. It should look like this:
language: ruby
rvm:
- 2.1

script: bundle exec jekyll build

branches:
  only:
    - master

deploy:
  provider: cloudfoundry
  edge: true
  api: $CF_API
  username: $CF_USER
  password: $CF_PASS
  organization: $CF_ORG
  space: $CF_ENV
Let’s dig a little deeper:
language: ruby
This line tells Travis to use a Ruby build container. It gives your script access to Bundler, RubyGems, and a Ruby runtime.
rvm:
- 2.1
RVM is a popular Ruby Version Manager (like rbenv, chruby, etc). This directive tells Travis the Ruby version to use when running your test script.
script: bundle exec jekyll build
This will run the Jekyll build command to generate the static website.
branches:
  only:
    - master
``

This will make sure Travis is only activated when a commit is pushed to the master branch.
The entry is completely optional. Travis will build from every push to any branch of your repo if leave it out.

```yaml
deploy:
  provider: cloudfoundry
  edge: true
  api: $CF_API
  username: $CF_USER
  password: $CF_PASS
  organization: $CF_ORG
  space: $CF_ENV
Travis CI works with the notion of deploy providers to deploy to different platform. You can read more about them here. Since Bluemix is based on Cloud Foundry we can use the Cloud Foundry deployment provider. If you don’t have an account yet, or don’t know how to get up and running with Jekyll with Bluemix then definitely check out my previous post about running Jekyll on Bluemix.
We are using environment variables ($CF_API, $CF_USER, $CF_PASS, $CF_ORG and$CF_ENV) that we still need to define since we don’t want our credentials to be available in cleartext in a file that is available on GitHub. Always externalize sensitive information!
Securely set environment variable in Travis CI
Login to Travis CI and go your repository settings:
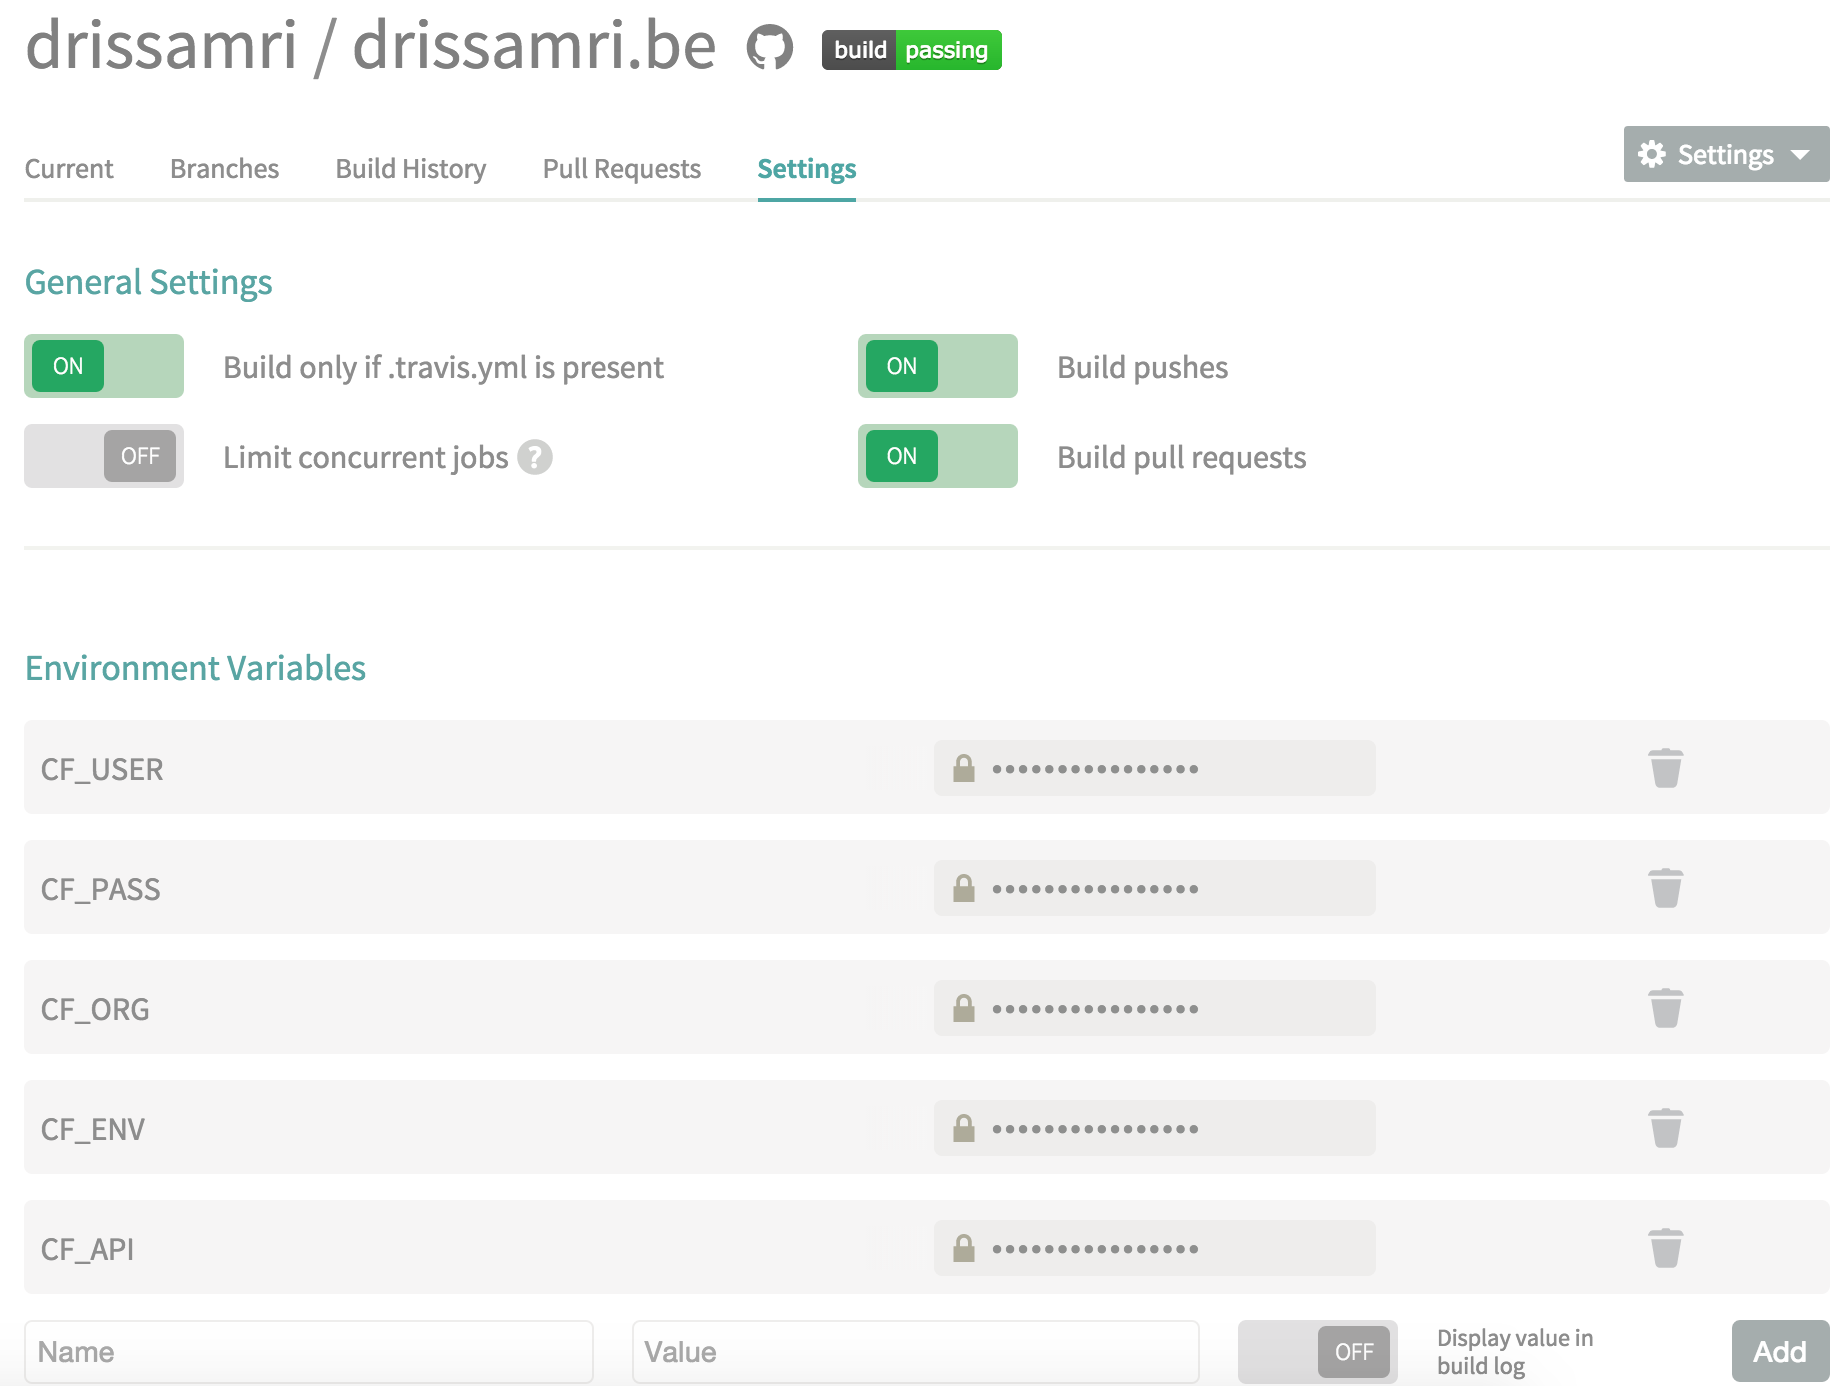
All the variables we defined you can define here for your repository. Your Bluemix username, password, organization and space are unique for your account. The CF_API will be set to https://api.eu-gb.bluemix.net if you use the EU region on Bluemix.
Now you should be good to go, on your next Git push you should be able to see the output in TravisCI:

Continuous Integration with HTML proofer
Now that our deployment is automated, we’ll take it one step further. On each Git push I want to make sure that all links and images on my website are actually still valid. It’s possible by moving content or images around that links break. Also external links might be unavailable over time. This is easily achieved by using html-proofer.
Add an extra Ruby gem for the html-proofer in the Gemfile:
source 'https://rubygems.org'
gem "jekyll"
gem "html-proofer"
All that is left to do is add an extra script to our .travis.yml file.
script:
  - bundle exec jekyll build
  - bundle exec htmlproof ./_site
Jekyll build will make sure that my site is generated under ./_site, so the following step is to run htmlproof on the generated site. If you have any broken links on your site, the build will fail and tell you which links you need to fix. Since the build will fail, the deployment step will not be executed.
There are two optimalizations you can do to speed up the build. One is to use the Travis CI caching mechanism to store your dependencies. This can be done by adding cache: bundler
to your .travis.yml. The other is to set an environment variable NOKOGIRI_USE_SYSTEM_LIBRARIES to TRUE. This is mentioned in the html-proofer GitHub and in the Jekyll documentation.
Learn more
If you got this far, well done! You have just saved you some minutes for every future deployment! If you ran into issues, feel free to let me know in the comments or on Twitter.
Are you interested in learning more about Cloud Foundry and Bluemix? Have questions or problems? Feel free to drop in the unofficial Bluemix Devs Slack channel to come chat with other developers! You can join HERE